HPCC Systems 6.0.x Releases
Welcome to the Red Book for HPCC Systems® 6.0.0. There are several sections in this Red Book as follows:
- General HPCC Systems Core Platform
- Significant New Features Core Platform
- ECL IDE
- MySQL
This is a major release with some great performance enhancements and new features. Want to know more? Read the beta 1 and beta 2 blogs for more details. You can also watch a video of Flavio Villanustre and Lorraine Chapman discussing some of the 6.0.0 highlights.The platform and supporting documentation for this release is available on our website.
Users upgrading from HPCC Systems® 4.x.x or 5.x.x, will also find it useful to glance over the redbook items from the releases in between.
From HPCC Systems® 5.0.0, the new ECL Watch pages are used as the default, so if you are upgrading from a release using the legacy version, take a look at the ECL Watch Transition and Quick Guide to help you bridge the gap.
Here's how to contact us if you find an issue or want to add something to the Red Book:
- To raise an issue, use our Community Issue Tracker. Please create yourself an account if you don't already have one, to get automatic updates as your issue progresses through the workflow.
- To ask a developer a technical question about something you are doing or have encountered, post in the Developer Forum.
General HPCC Systems Core Platform
NEW - Additional dependency required for Couchbase plugin
The dependencies for this plugin are not currently in the standard repositories for many distros. If you want to install this plugin, go to the official Couchbase developer site and follow the directions supplied to install their repository. Once you have done so, install the HPCC Systems Couchbase plugin in the usual way using either yum or dpkg with apt-get install -f to pull in the dependency from the Couchbase repository you just installed.
https://track.hpccsystems.com/browse/HPCC-16412
NEW - Downloading an XLS file and opening it in Excel produces a blank screen
You may encounter this issue when downloading your HPCC Systems workunit results into an xls file for viewing in Microsoft Excel. Modern versions of Microsoft Excel include additional security restrictions on imported files which mean that you can't see the contents of your downloaded file because of the 'protected view' setting which you need to change to 'trust' the source. To do this:
- Open Excel
- Click File/Options
- Select Trust Center and press Trust Center Settings...
- Go to Protected View and uncheck all boxes
- Restart Excel and open the file.
https://track.hpccsystems.com/browse/HPCC-16031
NEW - Some common init system commands are deprecated in CentOS 7
CentOS 7 no longer uses the init system process and net-tools and we are in the process of updating our init scripts to take account of these changes. When using CentOS 7 some commands have changed for example:
service hpcc-init restart
is deprecated and you will need to use:
systemctl restart hpcc-init
More information about the differences between CentOS 5, 6 and 7 is available here: https://access.redhat.com/sites/default/files/attachments/rhel_5_6_7_cheatsheet_a4_1114_jcs.pdf
https://track.hpccsystems.com/browse/HPCC-15618
NEW - Withdrawal of Java SE 6 support
Our normal policy is to always use the version of any 3rd party component that is standard in any distro's repository. However some components, like Java are typically updated independently of the distro. Because Java SE 6 is no longer supported, it doesn't makes sense to use this version as the one we support even for distros where this was the default. These distros, will now require Java SE 7, which may need to be installed manually prior to the installation of the HPCC Systems® Java plugin.
https://track.hpccsystems.com/browse/HPCC-15495
NEW - FOLD and NOFOLD options usage
Please note that from HPCC Systems® 6.0.0, an external service declaration will only fold if explicitly marked as foldable using the FOLD attribute. Usage of these options is documented in the HPCC Systems ECL Language Reference.
https://track.hpccsystems.com/browse/HPCC-14247
NEW - Warnings from embedded C++ are no longer allowed
All warnings from embedded C++ are now treated as errors and any ECL code containing embedded C++ that generates errors of this kind will fail. The solution is to fix the faulty embedded C++ code.
https://track.hpccsystems.com/browse/HPCC-14388
NEW - Embedded language plugins are now built separately from the platform
In previous releases, we supplied platform downloads which included/excluded the embedded language plugins. From HPCC Systems 6.0.0®, there is only one version of the platform and each embedded language plugin is shipped in a separate package. Embedded language plugins are available for all distros here: https://hpccsystems.com/download/hpcc-platform. Use the Type of Package filter to select the embedded language plugin you need.
https://track.hpccsystems.com/browse/HPCC-14456
NEW - 100% Javascript Graph Viewer
From HPCC Systems release 6.0.0, a new 100% Javascript Graph Viewer will be available to circumvent the problems caused by the phasing out of NPAPI support. (Chrome users will be unable to view graphs in ECL Watch which previously relied on NPAPI support.) There will be no separate installation process for the new Javascript Graph Viewer, it will simply run automatically within your browser. This also has security benefits since it will run without the need to activate or install any controls or plugins from potentially unknown sources. It will also be supported by most modern browsers removing the restrictions imposed by the withdrawal of NPAPI support.
Note: This affects users of Chrome 35 on Linux and Chrome 42 on Windows. However, support will also be phased out for Chrome on OSX and Windows at some point in the future. You can find out more information about this from the Chromium blog here: http://blog.chromium.org/2013/09/saying-goodbye-to-our-old-friend-npapi.html and information for developers is here: http://www.chromium.org/developers/npapi-deprecation.
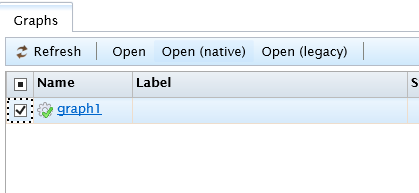
In HPCC Systems 6.0.0 the "tree graph view" is now the default Graph Viewer. It also now defaults to using the JavaScript graph control. The old version of Graph Control is still available and can be invoked from the Graphs tab in ECL Watch. Select a graph and choose:
- Open (native) option. Use the new graph page with the ActiveX graph control if its available.
- Open (legacy) option. Use the old default graph page which uses the ActiveX control if available otherwise it will use the JS graph control.
Note: The Javascript Graph Viewer was introduced as a technical preview in HPCC Systems 5.2.0. You can find out more about it in the blog about new features in HPCC Systems 5.2.0 which illustrates how it will enable us to improve the quality of information we can provide for you about your job via graphs.
https://track.hpccsystems.com/browse/HPCC-12805
NEW - New minimum version dependencies for Hiredis and Memcached
The minimum version of libhiredis required is 0.130.
Note: If the operating system you are using does not support Redis 0.13.0 or greater, the new connection caching facility that we have recently built in to the HPCC Systems Redis plugin will not be available to you. To use this functionality, you will need to upgrade both your operating system and HPCC Systems platform version.
https://track.hpccsystems.com/browse/HPCC-15243
The minimum version of libmemcached required is 1.0.10.
https://track.hpccsystems.com/browse/HPCC-13921
NEW - Despraying of files to a destination other than an HPCC Systems designated dropzone is prohibited
Despraying to any location other than a designated HPCC Systems® dropzone opens up the possibility of users overwriting another file. There are also security implications related to allowing users to despray 'anywhere'.
From HPCC Systems® 6.0.0, to be able to despray a file to a specific location, that location must be specified as an HPCC Systems® dropzone. This is true whether you are despraying from ECL Watch or calling File Services from within your ECL Code.
Despray actions to a location that is not a designated HPCC Systems dropzone will fail.
The answer is to either change the despray destination to use a designated HPCC Systems® dropzone, or if the location has been authorized to be an acceptable destination from a security perspective, add it to the list of designated HPCC Systems® dropzones.
https://track.hpccsystems.com/browse/HPCC-14791
NEW - CSV/UTF spray separator changes
From HPCC Systems® 6.0.0, if a separator string contains one or more comma characters, each comma is interpreted as '\,'
This change was needed because the interpretation of ',' in parameters, especially when used to setup the separator between the fields, was not being handled consistently and in some cases, no separator was being added.
https://track.hpccsystems.com/browse/HPCC-14967
NEW - Single shared permissions cache is now the default setting for Security Managers
Each ESP Service creates its own LDAP Security manager which in turn, creates its own cache requiring information requested from the LDAP server. In HPCC Systems® 6.0.0, we have implemented an improvement which allows all security manager instances to share the same cache, removing the need to request this information on an individual basis. The default behavior is for the cache to be shared (sharedCache=true as show below), however, it is configurable. So, if you prefer to continue using individual caching you can do so using the HPCC Systems® Configuration manager to set sharedCache=false.
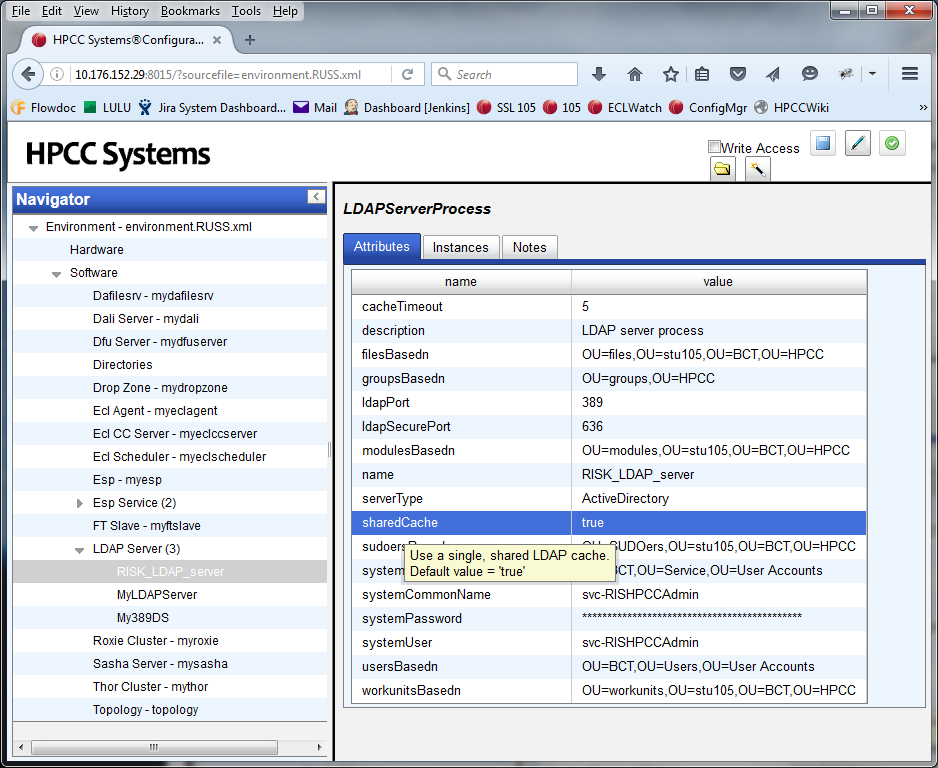
https://track.hpccsystems.com/browse/HPCC-15439
Significant New Features - HPCC Systems Core Platform
These features provide significant performance and usability benefits, helping you get the best out of HPCC Systems 6.0.0:
NEW - Modifying environment settings for 6.2 ESP Logging services
In HPCC Systems 6.2.0, two major changes have been made to the ESP Logging services feature.
- The Cassandra Logging Agent has been added which allows you to store logging information into a Cassandra data store.
- Both LogSourceMap and LogGroup have been added to support multiple database instances/tables used by diffrent data services:
LogSource < - > data service
LogGroup < - > database tables
Fieldmap < - > database table
Field < - > database table column
To use the ESP Logging service in HPCC Systems 6.2.0, the following changes should be made in your environment.xml after creating the ESP Logging service using ConfigMgr.
Settings for ESP Logging agent
Note: If the ESP Logging agent is not being used, skip this section.
- Add LogSourceMap
The LogSourceMap defines which data service uses which database instance and which database tables.The database tables are defined in LogGroup.
Open your environment.xml and inside the <ESPLoggingAgent...> section, add 1 or more <LogSourceMap> sections, for example:
<ESPLoggingAgent>
...
<LogSourceMap>
<LogSource name="TestLogging" mapToDB="cassandra_log_agent" mapToLogGroup="LogGroup1"/>
<LogSource name="mathservice" mapToDB="log_test" mapToLogGroup="LogGroup1"/>
<LogSource name="exchangeservicep" mapToDB="log_test" mapToLogGroup="LogGroup1"/>
<LogSource name="DFUQuery" mapToDB="log_eclwatch_files" mapToLogGroup="LogGroup2"/>
<LogSource name="TestLogging2" mapToDB="log_test" mapToLogGroup="LogGroup2"/>
</LogSourceMap>
...
</ESPLoggingAgent>
Settings for the MySQL Logging Agent in ESP ws_logging service
Note: If the ESP ws_logging service or MySQL Logging Agent is not used, skip this section.
- Add LogSourceMap. Open your environment.xm and inside the <MySQLLoggingAgent...> section, add 1 or more <LogSourceMap> sections, for example:
<MySQLLoggingAgent>
...
<LogSourceMap>
<LogSource name="TestLogging" mapToDB="log_test" mapToLogGroup="LogGroup1"/>
<LogSource name="mathservice" mapToDB="log_test" mapToLogGroup="LogGroup1"/>
<LogSource name="exchangeservicep" mapToDB="log_test" mapToLogGroup="LogGroup1"/>
<LogSource name="DFUQuery" mapToDB="log_eclwatch_files" mapToLogGroup="LogGroup2"/>
<LogSource name="TestLogging2" mapToDB="log_test" mapToLogGroup="LogGroup2"/>
</LogSourceMap>
...
</MySQLLoggingAgent>
2. Add LogGroup. Open your environment.xml and inside the <MySQLLoggingAgent...> section, add 1 or more <LogGroup> sections, for example:
<MySQLLoggingAgent>
...
<LogGroup name="LogGroup1">
<Fieldmap table="service_log">
<Field name="UserRequest/ExchangeNumbersRequest/Description" mapTo="user_id" type="varchar" default="unknown"/>
<Field name="ESPContext/SourceIP/" mapTo="user_ip_address" type="varchar"/>
<Field name="UserContext/Target[@username]" mapTo="request_user_id" type="varchar"/>
<Field name="UserContext/Target[@url]" mapTo="target_url" type="varchar"/>
<Field name="UserContext/Context/Row/Common/TransactionId" mapTo="transaction_id" type="varchar"/>
<Field name="UserRequest/" mapTo="request" type="text"/>
<Field name="UserResponse/" mapTo="actual_response" type="text"/>
<Field name="LogDatasets/LogDatasets/Dataset[@name='LOG_log__vin_intermediate__log']/Row/Records/Rec/Content_Type" mapTo="request_user_id" type="varchar"/>
<Field name="UserContext/Context/Row/Common/ESP/Config/Method[@url]" mapTo="target_url" type="varchar"/>
</Fieldmap>
<Fieldmap table="service_log_1">
<Field name="UserContext/Context/Row/Common/TransactionId" mapTo="transaction_id" type="varchar"/>
<Field name="ESPContext/NameNotSet/" mapTo="test_default" type="varchar" default="unknown"/>
<Field name="ESPContext/SourceIP/" mapTo="user_ip_address" type="varchar"/>
<Field name="UserRequest/" mapTo="request" type="text"/>
</Fieldmap>
</LogGroup>
<LogGroup name="LogGroup2">
<Fieldmap table="service_log_2">
<Field name="ESPContext/UserName/" mapTo="user_id" type="varchar" default="unknown"/>
<Field name="ESPContext/SourceIP/" mapTo="user_ip_address" type="varchar"/>
<Field name="UserContext/MyUserContext/Target[@username]" mapTo="request_user_id" type="varchar"/>
<Field name="UserContext/MyUserContext/Target[@url]" mapTo="target_url" type="varchar"/>
<Field name="UserRequest/" mapTo="request" type="text"/>
<Field name="UserResponse/" mapTo="actual_response" type="text"/>
</Fieldmap>
<Fieldmap table="service_log_3">
<Field name="ESPContext/NameNotSet/" mapTo="test_default" type="varchar" default="unknown1"/>
<Field name="ESPContext/SourceIP/" mapTo="user_ip_address" type="varchar"/>
<Field name="UserRequest/" mapTo="request" type="text"/>
<Field name="BackEndResponse/" mapTo="raw_response" type="text"/>
</Fieldmap>
</LogGroup>
...
</MySQLLoggingAgent>
Settings for the Cassandra Logging Agent
Note: If the ESP ws_logging service or Cassandra Logging Agent is not used, skip this section.
- Create Cassandra Logging Agent using ConfigMgr
- Similar to process for the MySQL Logging agent, add both LogSourceMap and LogGroup to Cassandra Logging Agent. Then open your environment.xml and inside the <CassandraLoggingAgent...> section, add 1 or more <LogSourceMap> sections. Also add 1 or more <LogGroup> sections, for example:
<CassandraLoggingAgent>
...
<LogSourceMap>
<LogSource name="TestLogging" mapToDB="cassandra_log_agent" mapToLogGroup="LogGroup1"/>
<LogSource name="mathservice" mapToDB="cassandra_log_agent" mapToLogGroup="LogGroup1"/>
<LogSource name="exchangeservicep" mapToDB="log_test" mapToLogGroup="LogGroup1"/>
<LogSource name="DFUQuery" mapToDB="log_eclwatch_files" mapToLogGroup="LogGroup2"/>
<LogSource name="TestLogging2" mapToDB="log_test" mapToLogGroup="LogGroup2"/>
</LogSourceMap>
<LogGroup name="LogGroup1">
<Fieldmap table="service_log">
<Field name="UserRequest/ExchangeNumbersRequest/Description" mapTo="user_id" type="varchar" default="unknown"/>
<Field name="ESPContext/SourceIP/" mapTo="user_ip_address" type="varchar"/>
<Field name="UserContext/Target[@username]" mapTo="request_user_id" type="varchar"/>
<Field name="UserContext/Target[@url]" mapTo="target_url" type="varchar"/>
<Field name="UserContext/Context/Row/Common/TransactionId" mapTo="transaction_id" type="varchar"/>
<Field name="UserRequest/" mapTo="request" type="text"/>
<Field name="UserResponse/" mapTo="actual_response" type="text"/>
<Field name="LogDatasets/LogDatasets/Dataset[@name='LOG_log__vin_intermediate__log']/Row/Records/Rec/Content_Type" mapTo="request_user_id" type="varchar"/>
<Field name="UserContext/Context/Row/Common/ESP/Config/Method[@url]" mapTo="target_url" type="varchar"/>
</Fieldmap>
<Fieldmap table="service_log_1">
<Field name="UserContext/Context/Row/Common/TransactionId" mapTo="transaction_id" type="varchar"/>
<Field name="ESPContext/NameNotSet/" mapTo="test_default" type="varchar" default="unknown"/>
<Field name="ESPContext/SourceIP/" mapTo="user_ip_address" type="varchar"/>
<Field name="UserRequest/" mapTo="request" type="text"/>
</Fieldmap>
</LogGroup>
<LogGroup name="LogGroup2">
<Fieldmap table="service_log_2">
<Field name="ESPContext/UserName/" mapTo="user_id" type="varchar" default="unknown"/>
<Field name="ESPContext/SourceIP/" mapTo="user_ip_address" type="varchar"/>
<Field name="UserContext/MyUserContext/Target[@username]" mapTo="request_user_id" type="varchar"/>
<Field name="UserContext/MyUserContext/Target[@url]" mapTo="target_url" type="varchar"/>
<Field name="UserRequest/" mapTo="request" type="text"/>
<Field name="UserResponse/" mapTo="actual_response" type="text"/>
</Fieldmap>
<Fieldmap table="service_log_3">
<Field name="ESPContext/NameNotSet/" mapTo="test_default" type="varchar" default="unknown1"/>
<Field name="ESPContext/SourceIP/" mapTo="user_ip_address" type="varchar"/>
<Field name="UserRequest/" mapTo="request" type="text"/>
<Field name="BackEndResponse/" mapTo="raw_response" type="text"/>
</Fieldmap>
</LogGroup>
</CassandraLoggingAgent>
3. Add Cassandra Logging Agent to the ESP ws_logging service. Open your environment.xml and inside the <EspService... name="wslogging"> section, add 1 or more <CassandraLoggingAgent> sections, for example:
<EspService>
...
<CassandraLoggingAgents CassandraLoggingAgent="cassandraloggingagent"/>
...
</EspService>
https://track.hpccsystems.com/browse/HPCC-14699
Virtual Thor slave settings
Thor clusters can be configured to take full advantages of the resources available per node using the new Thor configuration option channelsPerSlave, to set the number of cores per CPU. The slavesPerNode configuration option still exists and you can use both in combination if required. If you choose to do this, we recommend that you set slavesPerNode to the number of physical CPUs.
If you're interested in the theory behind the implementation of this feature, there is a section about the virtual slave Thor in the beta 1 blog.
https://track.hpccsystems.com/browse/HPCC-8710
Affinity support is available as the default setting in HPCC system 6.0.0
We have enabled the use of affinity by default when running multiple physical slaves on the same machine. Affinity allows Thor slave processes to be bound to specific cores on a machine which means they can share resources and reduce the synchronisation overheads. For more information, read Unleash the power of multi-core technology with HPCC Systems 6.0.0.
https://track.hpccsystems.com/browse/HPCC-14522
Using code signing for increased security
We now limit which SERVICE functions are called at compile time using the FOLD attribute. Additional keys can be installed on the eclserver machine. This means if you want to use your own service definitions, they can be signed using a key that has been installed in this way. Using this method, a trusted person can sign code to indicate that it is ok for untrusted people to use, without allowing the untrusted people to execute arbitrary code.
https://track.hpccsystems.com/browse/HPCC-13173
You can also configure the access rights (which control the ability to use PIPE, embed C++, or declare a SERVICE as foldable) to be dependent on the code being signed. This means that we can provide signed code in the ECL Standard Library that makes use of these features, without opening them up for anyone to call anything.
https://track.hpccsystems.com/browse/HPCC-14185
More details about these code signing improvements can be found in the beta 1 blog in the section Security enhancements in the compiler.
Cassandra workunit storage
HPCC Systems® 6.0.0 is the first release to contain an option to use a Cassandra database in place of Dali for storing workunit information. When in use, this change will be transparent to users and from a capacity point of view, there will be no need to archive off workunits. You'll need to install Cassandra and configure your HPCC Systems® to use it. Existing workings can be exported from Dali and imported into your new Cassandra workunit storage area using wutool. Detailed steps are provided in the HPCC Systems Administrators' Guide. You can also read an overview of how it works in the beta 1 blog.
https://track.hpccsystems.com/browse/HPCC-12251
BUILD(index, dataset) syntax changes
In releases prior to HPCC Systems 6.0.0, the usual way of defining and building an index is done in terms of the dataset that is used to create it:
ds = DATASET(100, TRANSFORM({ unsigned id }, SELF.id := COUNTER));
i := INDEX(ds. { id }, 'myIndex');
BUILD(i);
This is fine when the dataset used to build the index is relatively simple. However there are a couple of downsides:
- The index can't be logically separated from the dataset to create it from
- Sometimes the dataset is very complicated (Mb of source). When the index is subsequently used in a query, all the code to create it is also parsed.
From HPCC Systems 6.0.0, we recommend that you use the following new syntax which allows the two to be separated:
ds = DATASET(100, TRANSFORM({ unsigned id }, SELF.id := COUNTER));
i := INDEX({ unsigned id }, 'myIndex');
BUILD(i, ds);
The fields are mapped by name. This form of BUILD also supports the other BUILD options (e.g., new filename, distrbute, etc.)
While this requires you to make some significant changes to your ECL code, it is worth doing to take advantage of the potential benefit of reduced compile times.
https://track.hpccsystems.com/browse/HPCC-8663
REGEXFINDSET for splitting strings
REGEXFINDSET is a new ECL language feature that may used to extract matching patterns from a string or may be used to split a string based on pattern. Previously, you may have worked around how to achieve this using one of the following methods:
- Std.Str.SplitWords. But only if a single delimiter was enough.
- Std.Str.SplitWords but pre-process the string using pre-processed with SubstituteOutXXX calls to map all delimiters to one.
- Roll custom C++. The was error prone and re-invented by every ECL programmer.
- Roll custom ECL converting the string to a dataset with a record per char, then use rollup/group/dedup operations. Extremely inefficient and impossible to maintain.
REGEXFINDSET provides significant performance benefits over these methods which use multiple parsing and string operations to achieve the same results. Examples of how to use REGEXFINDSET include:
REGEXFINDSET('\w+@[a-zA-Z_]+?\.[a-zA-Z]{2,3}' , str) /* generate a set of all email addresses from str */REGEXFINDSET('[^.]+', str) /* generate a set of sentences from str */REGEXFINDSET('[^ |^,|^\r|^\t|^"|^.]+', str) /* generate a set of all words contained in str */https://track.hpccsystems.com/browse/HPCC-14402
Javascript Graph Control
Due to the phased out support of NPAPI plugins in Chrome, we have introduced a new 100% JavaScript Graph Control. Since this is effectivly a brand new visualization, you can expect to see different layouts and behavior. However for non-chrome based browsers, there is still a 'legacy' option available. Please report any unexpected behavior via our Community Issue Tracker.
We have noted the phasing out of NPAPI support in the Red Book for HPCC Systems 5.0.x. You can also find out more about the new 100% Javascript Graph Control from the blog on our website.
https://track.hpccsystems.com/browse/HPCC-14573
Explicit control of MulticastTTL setting
A Roxie cluster is often all on a single subnet and does not span across routers. With a multicast TTL of 1 (the new default) Roxie multicast traffic will not get forwarded beyond its own subnet, potentially saving network bandwidth. If, for some reason, multicast traffic does need to go across a router to another subnet, this setting can be increased by one for each router to be traversed. If you find you need to change the default setting, go to the RoxieCluster Attributes using the HPCC Systems Configuration Manager and change the value in the multicastTTL option to the number you require for your specific circumstances.
Note: Switch settings (such as enabling IGMP snooping) and vlans can also be used for similar multicast isolation and bandwidth saving.
https://track.hpccsystems.com/browse/HPCC-13451
Distribute pull buffer size is now configurable
Distribute uses a fixed size buffer to receive the distribute rows. When exceeded, it spills to disk by default or optionally via a configuration option blocks (until downstream reader, reads). There is now an option to configure this size as there is for other limits. We recommend using the default setting which is 32MB.
https://track.hpccsystems.com/browse/HPCC-14466
Dali backup queue limits are now configurable
This can now be done using the throttle command from dafscontrol:
Usage : dafscontrol [<dali-ip>] THROTTLE <ip-or-cluster> <class> <limit> <ms-delay> <cpu-limit> <queue-limit>
class
0 = standard
1 = slow
Standard action are things like read,write,size,rename,createdir,setdir, i.e. regular file actions. Slow actions are things like - file copy, getcrc, treecopy
They are divided this way, because they have very different usage patterns and durations. All the other options are configurable per class.
limit (std default 80, slow default 20)
The number of parallel transactions on which dafilesrv should work.
ms-delay (std default 1000, slow default 5000)
The millisecond delay to introduce (maximum) if the limit is exceeded. Any delayed transaction will immediately start (i.e. in < limit) if a slot becomes available.
cpu-limit (std default 85, slow default 75)
The limit only applies if the cpu usage is above these figures.In other words, > limit transactions can run in parallel if cpu is e.g. < 85%
queue-limit (std default 1000, slow default 10000
Upper limit transactions that can be queued pending available slot.
https://track.hpccsystems.com/browse/HPCC-15322
NEW - TRACE activity saves data into a log file with no detectable performance overheads
Tracing is not output by default even if TRACE statements are present. The workunit debug value traceEnabled must be set or the default platform settings changed to always output tracing.
In Roxie you can also request tracing on a deployed query by specifying traceEnabled=1 in the query XML. So you can leave trace statements in the ECL without any detectable overhead until tracing is enabled. Tracing is output to the log file, in the form:
TRACE: value...
The syntax to use is:
myds := TRACE(ds [, traceOptions]);
Available options are:
- Zero or more expressions, which act as a filter. Only rows matching the filter will be included in the tracing.
- KEEP (n) indicating how many rows will be traced.
- SKIP (n) indicating that n rows will be skipped before tracing starts.
- SAMPLE (n) indicating that only every nth row is traced.
- NAMED(string) providing the name for the rows in the tracing.
It is also possible to override the default value for KEEP at a global, per-workunit, or per-query level.
#option (traceEnabled, 1) // trace statements will be enabled
#option (traceLimit, 100) // overrides the default keep value (10) for activities that don't specify it.
Note: You can use a stored boolean as the filter expression for a trace activity, allowing you to turn individual trace activities on and off.
https://track.hpccsystems.com/browse/HPCC-12872
ECL IDE
NEW - Open source version of ECL IDE is now available
From HPCC Systems® 6.0.0, an open source version of ECL IDE is available for you to download. The ECL IDE sources are now available on GitHub.
https://track.hpccsystems.com/browse/IDE-474
NEW - To enable git support within ECL IDE, TortoiseGIT and any prerequisites must be installed
Once you have installed TortoiseGIT (and any other prerequisites), the context menus in ECL IDE will include options for carrying out git tasks, for example, branch changes.
To download TortoiseGIT go here: https://tortoisegit.org/download/. To find out whether there are additional prerequisites you will also need install, take a look at the FAQs.
https://track.hpccsystems.com/browse/IDE-451
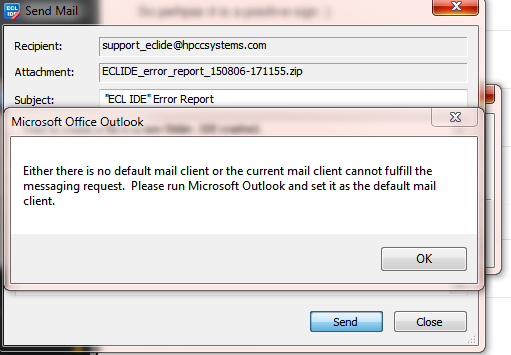
NEW - ECL IDE Crash Report facility requires a default email application to be installed
If ECL IDE crashes, you are presented with an opportunity to send the crash report to us for investigation. However, to use this facility you must have a default email application setup or you will receive the following error:
https://track.hpccsystems.com/browse/IDE-439
NEW - Remote repository users cannot delete attributes if a Trash folder does not exist
If you are using a remote repository and try to delete a file, you will get an error telling you 'Write accesss to module denied'. To be able to successfully delete a file, a Trash folder must exist within the remote repository. You can then move unwanted files to the Trash folder and successfully delete them.
https://track.hpccsystems.com/browse/IDE-435
MySQL
NEW - MySQL supported connection options
The EMBED statement on MySQL now allows various MySQL options to be specified, as in the following example:
dataset(transaction_id_record) fechIDS() := EMBED(mysql : MYSQL_OPT_CONNECT_TIMEOUT(1), user('root'),password('xyz'),database('log_test'),server('10.176.152.186'), port('3306'))SELECT * FROM transaction_ids;
ENDEMBED;
The full list of supported options is below and detailed descriptions of these options can be found in the MySQL documentation.
Note: Older versions of the MySQL client library may not support all options.
MYSQL_DEFAULT_AUTH
MYSQL_ENABLE_CLEARTEXT_PLUGIN
MYSQL_INIT_COMMAND
MYSQL_OPT_BIND
MYSQL_OPT_CAN_HANDLE_EXPIRED_PASSWORDS
MYSQL_OPT_COMPRESS
MYSQL_OPT_CONNECT_ATTR_DELETE
MYSQL_OPT_CONNECT_ATTR_RESET
MYSQL_OPT_CONNECT_TIMEOUT
MYSQL_OPT_GUESS_CONNECTION
MYSQL_OPT_LOCAL_INFILE
MYSQL_OPT_NAMED_PIPE
MYSQL_OPT_MAX_ALLOWED_PACKET
MYSQL_OPT_NET_BUFFER_LENGTH
MYSQL_OPT_PROTOCOL
MYSQL_OPT_READ_TIMEOUT
MYSQL_OPT_RECONNECT
MYSQL_OPT_SSL_CA
MYSQL_OPT_SSL_CAPATH
MYSQL_OPT_SSL_CERT
MYSQL_OPT_SSL_CIPHER
MYSQL_OPT_SSL_CRL
MYSQL_OPT_SSL_CRLPATH
MYSQL_OPT_SSL_ENFORCE
MYSQL_OPT_SSL_KEY
MYSQL_OPT_SSL_MODE
MYSQL_OPT_SSL_VERIFY_SERVER_CERT
MYSQL_OPT_TLS_VERSION
MYSQL_OPT_USE_EMBEDDED_CONNECTION
MYSQL_OPT_USE_REMOTE_CONNECTION
MYSQL_OPT_USE_RESULT
MYSQL_OPT_WRITE_TIMEOUT
MYSQL_PLUGIN_DIR
MYSQL_READ_DEFAULT_FILE
MYSQL_READ_DEFAULT_GROUP
MYSQL_REPORT_DATA_TRUNCATION
MYSQL_SECURE_AUTH
MYSQL_SERVER_PUBLIC_KEY
MYSQL_SET_CHARSET_DIR
MYSQL_SET_CHARSET_NAME
MYSQL_SET_CLIENT_IP
MYSQL_SHARED_MEMORY_BASE_NAME
All pages in this wiki are subject to our site usage guidelines.